
Key Takeaways
- You need a Ring Doorbell resistor if:
- You don’t have old doorbell wires.
- You’re using a general power supply.
- You don’t need a Ring Doorbell resistor if:
- You’re replacing an old wired doorbell.
- The old doorbell setup fits the Ring Doorbell perfectly.
Setting up a Ring Doorbell? You might need a Ring Doorbell resistor, but why? This guide explains when a resistor is necessary, how it protects your device, and why it’s key for certain installations. Keep reading to learn more.
Do You Need a Resistor for Ring Doorbell?
No, you don’t need a Ring Doorbell resistor if you’re replacing an existing doorbell with a compatible transformer. However, if you don’t have existing doorbell wiring and are using a general power supply, a resistor may be required to regulate the power.

I didn’t need a resistor while installing my Ring Doorbell because I had existing wiring and a transformer. However, if you’re installing it without old doorbell wires or a transformer, you might need one.
For the Ring Video Doorbell Pro, a 25-ohm, 50W resistor is needed to bypass an internal chime and prevent damage. However, if you’re using an existing mechanical or digital chime with hardwired Ring models, no resistor is required as the chime acts as the load.
Why Should You Use a Ring Doorbell Resistor?
You should use a Ring doorbell resistor when installing a Ring Video Doorbell (especially a wired model) without a traditional chime. A resistor is essential because it regulates the flow of electricity to the doorbell.
Here’s why you should use a resistor for Ring Doorbell:
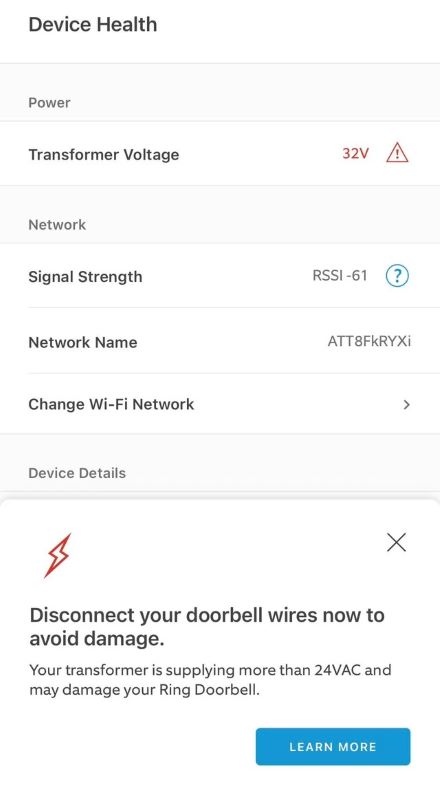
- ⚡ Voltage Regulation: A Ring Doorbell requires a specific voltage to operate efficiently. Without a resistor, voltage fluctuations may cause sudden surges that exceed the recommended power range, stressing the doorbell’s components and causing damage.
- 🔧 Reduces Malfunctions: A resistor controls the current, preventing power fluctuations that can cause the doorbell to reset, miss alerts, or malfunction, ensuring consistent performance.
- 🌡️ Prevents Overheating: A resistor limits the current flow, keeping the doorbell within safe operating limits and preventing it from overheating, which can lead to damage or safety hazards.
- 🔒 Essential for Safety: It reduces the risk of electrical hazards, like short circuits or fire, especially when bypassing the traditional doorbell chime system.
- ⏳ Enhances Long-Term Reliability: Proper power regulation reduces the likelihood of frequent repairs or replacements due to power-related issues. This not only keeps the device functioning smoothly for longer but also enhances its overall reliability.
How to Install a Resistor for Your Ring Doorbell
Installing a Ring Doorbell resistor sounds tricky, but it’s something you can do with a bit of guidance. Here’s a simple step-by-step guide to help you out:
What You Need
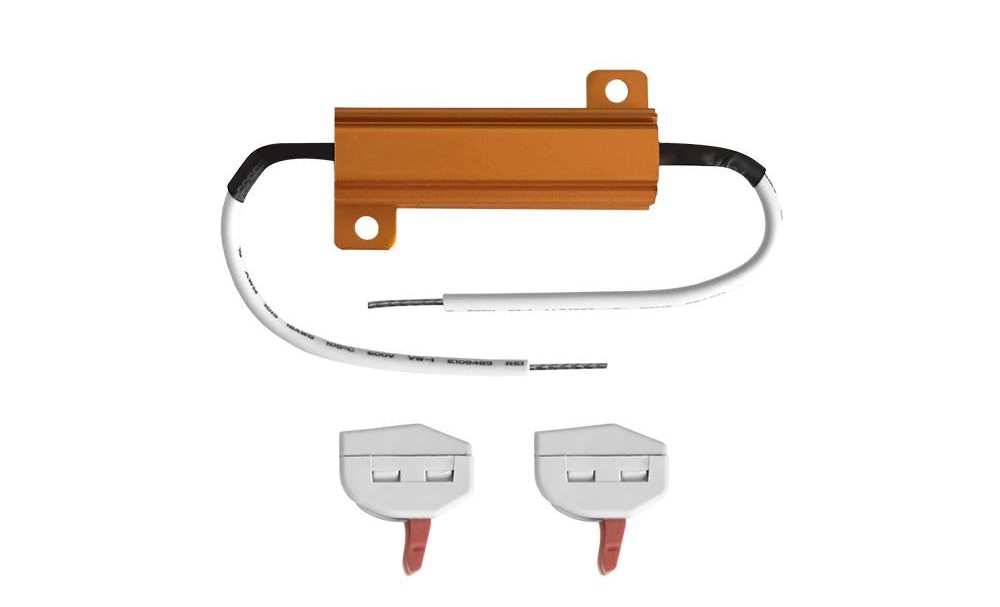
- A 25-ohm, 50W resistor (specifically for Ring Doorbell without an existing chime)
- Screwdriver
- Wire Strippers
- Electrical tape or wire nuts
- Safety Gloves
Steps to Install a Resistor for Ring Doorbell
Here are the steps to install a resistor for your Ring Doorbell:
- Switch off the power to your doorbell circuit at the breaker to ensure safety.
- Find the doorbell transformer and the wires where you’ll connect the Ring doorbell. Identify the positive and negative wires.
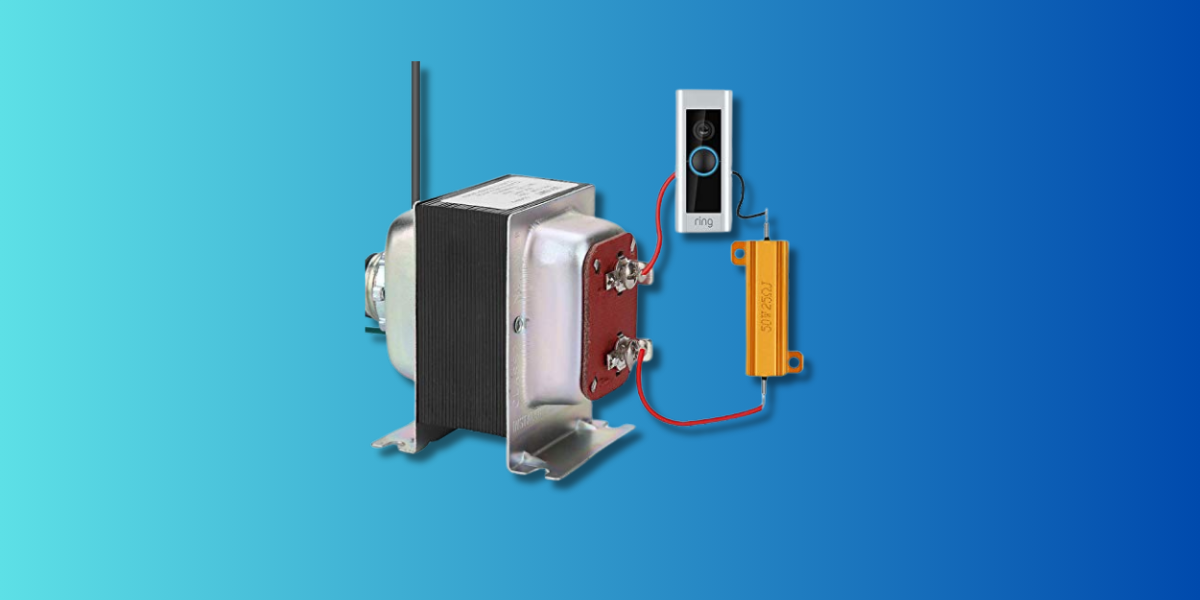
- Attach the resistor to one doorbell wire using wire connectors or by twisting them together securely in series with the Ring doorbell wiring.
- Connect the other end of the wire and resistor to the corresponding terminals on your Ring doorbell.
- Mount the Ring Doorbell to the wall or door frame according to the manufacturer’s instructions.
- Turn the breaker back on and press the Doorbell button to make sure the system works. Also, check the app to ensure it’s receiving power properly.
This setup will regulate the voltage to protect your Ring doorbell.
Tips for Safe and Effective Ring Doorbell Resistor Installation
Here are some tips for safe and effective Ring doorbell resistor installation:
- ⚡ Choose the Right Resistor: Use a 25-ohm, 50W resistor for compatible Ring models to ensure proper power regulation.
- 🔌 Turn Off Power: Always turn off the circuit breaker before starting installation to avoid electric shock.
- 🧤 Wear Safety Gloves: Always wear safety gloves to protect yourself from sharp edges and electrical shock.
- 📋 Follow Wiring Instructions: Connect the resistor correctly between the doorbell and the transformer according to Ring’s guide.
- 🔧 Secure the Resistor: Make sure the resistor is securely mounted to avoid loose connections or overheating.
- 🔥 Monitor Heat: If the resistor gets hot during operation, make sure it’s not in contact with any flammable materials.
- ✅ Test the Doorbell: After installation, test your Ring doorbell to ensure it’s receiving the right power and functioning properly.
👨🔧 If you’re unsure about the wiring or the setup doesn’t match your home’s, it’s best to call a professional. An electrician can handle the installation safely.
Is a Ring Resistor Really Necessary?
If you’re setting up a wired Ring Doorbell without a chime, use a resistor to protect it and ensure smooth operation. Check your Ring model’s instructions for the correct resistor type.
Here are some more helpful guides on Ring Doorbells:
- If your Ring Doorbell stops working after rain, dry it, wipe the lens, reconnect to Wi-Fi, and reset it.
- Ring Doorbell in direct sunlight isn’t safe. To protect it, install it in shade, use sun shields or covers, and use heat-resistant accessories.
- To prevent Ring Camera fogging up, use anti-fog spray, moisture repellents, or a shield, clean the lens, and check its weatherproof seals.
Frequently Asked Questions
Can I use a higher wattage resistor than recommended for my Ring Doorbell?
How often should I replace the resistor in my Ring Doorbell setup?
Is the Ring Pro Power Kit necessary?
Can I install the resistor outdoors?
Does using a resistor affect my Ring Doorbell’s warranty?
Does using a resistor affect my Ring Doorbell’s warranty?
Hashir
Hi, I’m Hashir, a tech enthusiast with a deep love for smart home innovations. My interest in technology has always been driven by the idea of making everyday life more streamlined and efficient. After years of experimenting with smart devices in my own home, I’ve made it my mission to share what I’ve learned with others. I focus on practical, easy-to-understand solutions that anyone can implement to enhance their home. Writing for JustSmarter allows me to connect with fellow tech lovers and help them take their first steps—or next steps—into the exciting world of smart homes.